

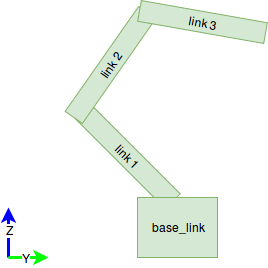
ROS simulating a 3 axis robot in Rviz
22 Apr 2017In this tutorial, we will create an urdf model of a 3 axis robot and simulate it in Rviz.
Create a package inside your workspace (create it if u haven’t any).
mkdir catkin_tutorial
cd catkin_tutorial
mkdir src
cd src
catkin_create_pkg three_axis_robot roscpp rospy urdf
Create a folder named urdf to store urdf models.
cd three_axis_robot/
mkdir urdf
Now create a new file called my_robot.urdf with these data.
<robot name="my_robot">
	<link name="base">
		<visual>
		  <geometry>
			<box size="2 2 2"/>
		  </geometry>
		  <origin rpy="0 0 0" xyz="0 0 1"/>
		</visual>
	</link>
	<link name="link1">
		<visual>
		  <geometry>
			<box size="0.5 0.5 3"/>
		  </geometry>
		  <origin rpy="0 0 0" xyz="0 0 1.5"/>
		</visual>
	</link>
	<link name="link2">
		<visual>
		  <geometry>
			<box size="0.5 0.5 3"/>
		  </geometry>
		  <origin rpy="0 0 0" xyz="0 0 1.5"/>
		</visual>
	</link>
	<link name="link3">
		<visual>
		  <geometry>
			<box size="0.5 0.5 3"/>
		  </geometry>
		  <origin rpy="0 0 0" xyz="0 0 1.5"/>
		</visual>
	</link>
	<joint name="joint0" type="continuous">
		<parent link="base"/>
		<child link="link1"/>
		<origin rpy="0 0 0" xyz="0 0 2"/>
		<axis xyz="1 0 0" />
	</joint>
	<joint name="joint1" type="continuous">
		<parent link="link1"/>
		<child link="link2"/>
		<origin rpy="0 0 0" xyz="0 0 3"/>
		<axis xyz="1 0 0" />
	</joint>
	<joint name="joint2" type="continuous">
		<parent link="link2"/>
		<child link="link3"/>
		<origin rpy="0 0 0" xyz="0 0 3"/>
		<axis xyz="1 0 0" />
	</joint>
</robot>
This link will give you a list of all possible tag tags and informations. (Read this before going further. link) There are 4 links and three joints in this robot. Each joint has one parent and one child.
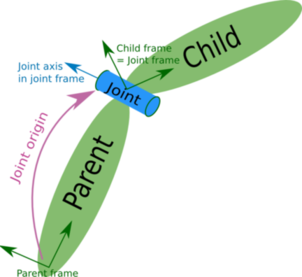
There are different types of joints. Here we used continuous and fixed type. Joint 0 is fixed and the rest of them are continuous. The origin tag inside the
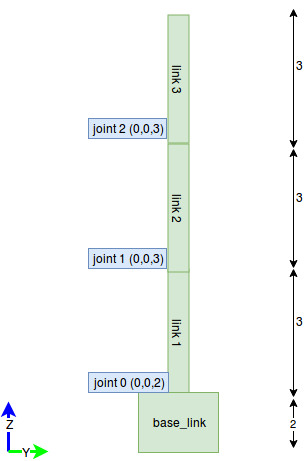
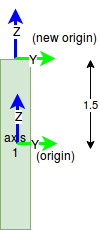
There is also an another origin tag inside link tag. This represent the base frame of the link itself. We need to shift it by 1.5 (half of the link length), other wise rotation will be around the middle part of each link rather than at the joint (This will make sure both the base frame; child and parent coincides).
Now create a file called my_robot.launch under launch folder. This will launch joint_state_publisher and robot_state_publisher node. joint_state_publisher node will publish all the joint states. This also has one gui where you can change each joint angles. robot_state_publisher node will take the joint angles of the robot as input and publishes the 3D poses of each links.
<launch>
    <arg name="model" />
    <param name="robot_description" textfile="$(find three_axis_robot)/urdf/my_robot.urdf" />
    <param name="use_gui" value="true"/>
    <node name="joint_state_publisher" pkg="joint_state_publisher" type="joint_state_publisher" />
    <node name="robot_state_publisher" pkg="robot_state_publisher" type="robot_state_publisher" />
    <node name="rviz" pkg="rviz" type="rviz" args="-d $(find three_axis_robot)/urdf/rviz.rviz" required="true" />
</launch>
Now create another file called rviz.rviz. (This is not actually needed. This is just a configuration file for Rviz saying that these panels should be there. You can open rviz and add the RobotModel and save the configuration by yourself.)
Panels:
  - Class: rviz/Displays
    Help Height: 78
    Name: Displays
    Property Tree Widget:
      Expanded:
        - /Global Options1
        - /Status1
      Splitter Ratio: 0.5
    Tree Height: 565
  - Class: rviz/Selection
    Name: Selection
  - Class: rviz/Tool Properties
    Expanded:
      - /2D Pose Estimate1
      - /2D Nav Goal1
      - /Publish Point1
    Name: Tool Properties
    Splitter Ratio: 0.588679016
  - Class: rviz/Views
    Expanded:
      - /Current View1
    Name: Views
    Splitter Ratio: 0.5
  - Class: rviz/Time
    Experimental: false
    Name: Time
    SyncMode: 0
    SyncSource: ""
Visualization Manager:
  Class: ""
  Displays:
    - Alpha: 0.5
      Cell Size: 1
      Class: rviz/Grid
      Color: 160; 160; 164
      Enabled: true
      Line Style:
        Line Width: 0.0299999993
        Value: Lines
      Name: Grid
      Normal Cell Count: 0
      Offset:
        X: 0
        Y: 0
        Z: 0
      Plane: XY
      Plane Cell Count: 10
      Reference Frame: <Fixed Frame>
      Value: true
    - Alpha: 1
      Class: rviz/RobotModel
      Collision Enabled: false
      Enabled: true
      Links:
        All Links Enabled: true
        Expand Joint Details: false
        Expand Link Details: false
        Expand Tree: false
        Link Tree Style: Links in Alphabetic Order
        base:
          Alpha: 1
          Show Axes: false
          Show Trail: false
          Value: true
        link1:
          Alpha: 1
          Show Axes: false
          Show Trail: false
          Value: true
        link2:
          Alpha: 1
          Show Axes: false
          Show Trail: false
          Value: true
        link3:
          Alpha: 1
          Show Axes: false
          Show Trail: false
          Value: true
      Name: RobotModel
      Robot Description: robot_description
      TF Prefix: ""
      Update Interval: 0
      Value: true
      Visual Enabled: true
  Enabled: true
  Global Options:
    Background Color: 48; 48; 48
    Fixed Frame: base
    Frame Rate: 30
  Name: root
  Tools:
    - Class: rviz/Interact
      Hide Inactive Objects: true
    - Class: rviz/MoveCamera
    - Class: rviz/Select
    - Class: rviz/FocusCamera
    - Class: rviz/Measure
    - Class: rviz/SetInitialPose
      Topic: /initialpose
    - Class: rviz/SetGoal
      Topic: /move_base_simple/goal
    - Class: rviz/PublishPoint
      Single click: true
      Topic: /clicked_point
  Value: true
  Views:
    Current:
      Class: rviz/Orbit
      Distance: 50.9065704
      Enable Stereo Rendering:
        Stereo Eye Separation: 0.0599999987
        Stereo Focal Distance: 1
        Swap Stereo Eyes: false
        Value: false
      Focal Point:
        X: 0
        Y: 0
        Z: 0
      Focal Shape Fixed Size: true
      Focal Shape Size: 0.0500000007
      Name: Current View
      Near Clip Distance: 0.00999999978
      Pitch: 0.355398387
      Target Frame: <Fixed Frame>
      Value: Orbit (rviz)
      Yaw: 2.21039844
    Saved: ~
Window Geometry:
  Displays:
    collapsed: false
  Height: 846
  Hide Left Dock: false
  Hide Right Dock: false
  QMainWindow State: 000000ff00000000fd00000004000000000000016a000002c4fc0200000008fb0000001200530065006c0065006300740069006f006e00000001e10000009b0000006400fffffffb0000001e0054006f006f006c002000500072006f007000650072007400690065007302000001ed000001df00000185000000a3fb000000120056006900650077007300200054006f006f02000001df000002110000018500000122fb000000200054006f006f006c002000500072006f0070006500720074006900650073003203000002880000011d000002210000017afb000000100044006900730070006c0061007900730100000028000002c4000000dd00fffffffb0000002000730065006c0065006300740069006f006e00200062007500660066006500720200000138000000aa0000023a00000294fb00000014005700690064006500530074006500720065006f02000000e6000000d2000003ee0000030bfb0000000c004b0069006e0065006300740200000186000001060000030c00000261000000010000010f000002c4fc0200000003fb0000001e0054006f006f006c002000500072006f00700065007200740069006500730100000041000000780000000000000000fb0000000a005600690065007700730100000028000002c4000000b000fffffffb0000001200530065006c0065006300740069006f006e010000025a000000b200000000000000000000000200000490000000a9fc0100000001fb0000000a00560069006500770073030000004e00000080000002e10000019700000003000004b00000003efc0100000002fb0000000800540069006d00650100000000000004b00000030000fffffffb0000000800540069006d006501000000000000045000000000000000000000022b000002c400000004000000040000000800000008fc0000000100000002000000010000000a0054006f006f006c00730100000000ffffffff0000000000000000
  Selection:
    collapsed: false
  Time:
    collapsed: false
  Tool Properties:
    collapsed: false
  Views:
    collapsed: false
  Width: 1200
  X: 345
  Y: 105
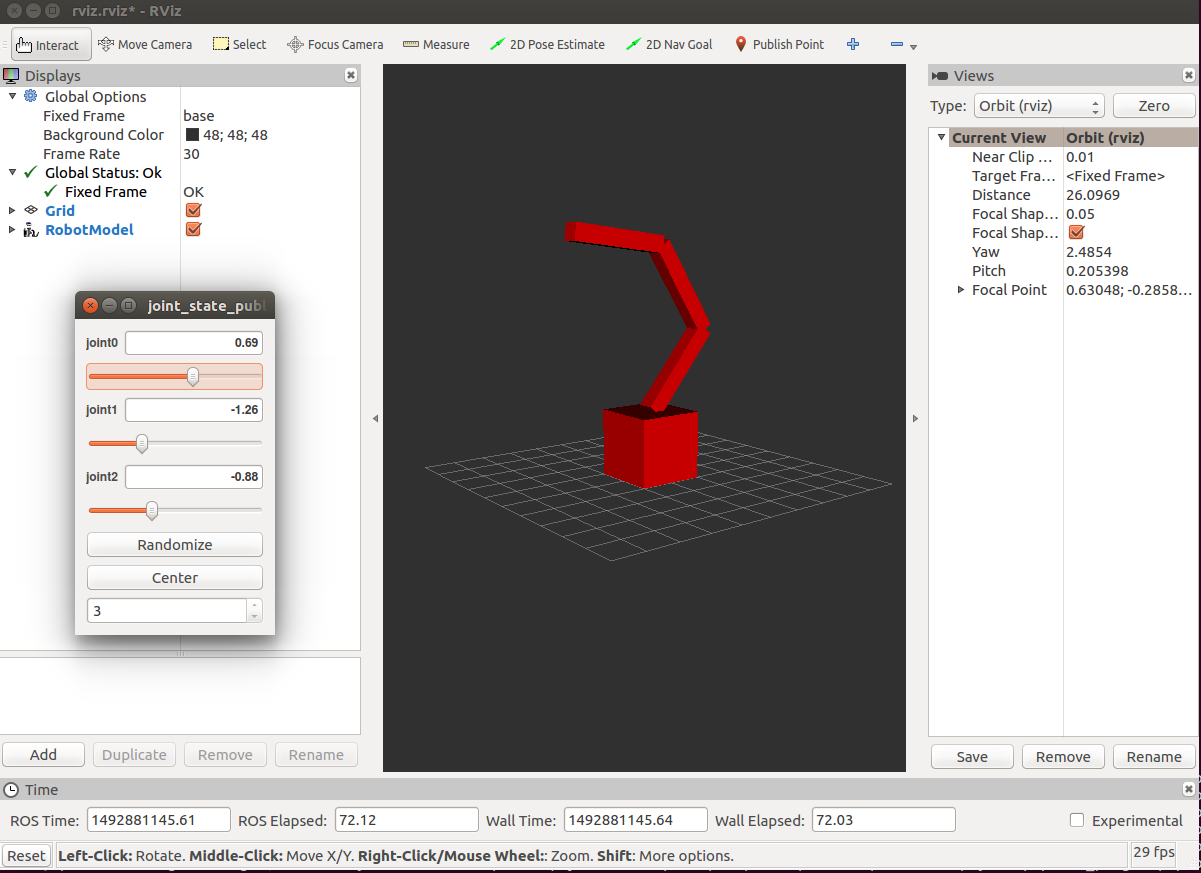
Now launch the launch file.
roslaunch three_axis_robot my_robot.launch
If you are planning to create a hardware and want to simulate the same, you can create a separate node that will publish joint states instead of using joint_state_publisher node.
Here instead of actual hardware ESP8266 is communicating with ROS and sending joint angles of a 5 axis robot.
You can refer these tutorials to get more in depth knowledge.
https://wiki.ros.org/urdf/Tutorials
https://www.youtube.com/watch?v=g9WHxOpAUns